Chemist: Difference between revisions
Created Guide for the Chemist. I had to cut it short due to an errand, made the basics, will expand upon them. The Chemmaster portion is unfinished and it needs more work. Having issues with icons and did not have time to make it pretty or check grammar. Most likely will be done with it later today. |
mNo edit summary |
||
| Line 24: | Line 24: | ||
!Description | !Description | ||
|- | |- | ||
|<center>'''Beakers'''[[File:Beaker.png| | |<center>'''Beakers'''[[File:Beaker.png|center|64x64px]][[File:GoldenBeaker.png|center|64x64px]][[File:LargeBeaker.png|center|64x64px]] | ||
|The most important gear you will use. Comes in multiple sizes and can be inserted into most of your machinery. Beakers hold 100 units of any liquid reagents, small beakers 50 and the vendable golden beakers hold a grand total of 200. They are extremely fragile and will break if you fall or are hit with an explosive, keep your workplace clean. Even though you can, in most cases you won't want to drink things from it. As of now, heating it does not affect them and they will never break (unless you heat something volatile). Transfer amounts are adjustable by right clicking the beaker. | |The most important gear you will use. Comes in multiple sizes and can be inserted into most of your machinery. Beakers hold 100 units of any liquid reagents, small beakers 50 and the vendable golden beakers hold a grand total of 200. They are extremely fragile and will break if you fall or are hit with an explosive, keep your workplace clean. Even though you can, in most cases you won't want to drink things from it. As of now, heating it does not affect them and they will never break (unless you heat something volatile). Transfer amounts are adjustable by right clicking the beaker. | ||
|- | |- | ||
|<center>'''Bottles & Vials'''[[File:Vial.png| | |<center>'''Bottles & Vials'''[[File:Vial.png|center|64x64px]][[File:Bottle.png|center|64x64px]] | ||
|Smaller reagent containers. Bottles always come with a 30 unit capacity where as vials may vary. The Plasma Vial your locker has holds only 10 units of Plasma. Can be used as output for the ChemMaster 3000. The Vial's main use is with the Table top Centrifuge. It is not uncommon for medical personnel to carry bottles full of different reagents for easy access on the move. | |Smaller reagent containers. Bottles always come with a 30 unit capacity where as vials may vary. The Plasma Vial your locker has holds only 10 units of Plasma. Can be used as output for the ChemMaster 3000. The Vial's main use is with the Table top Centrifuge. It is not uncommon for medical personnel to carry bottles full of different reagents for easy access on the move. | ||
|- | |- | ||
| Line 36: | Line 36: | ||
|Same as the Patch Boxes, they come empty. Functionally the same, but they can hold 10 pills in total while the pills have the same reagent capacity. Unlike patches, they apply all their reagents at once after some time has passed depending on how much reagent there is. | |Same as the Patch Boxes, they come empty. Functionally the same, but they can hold 10 pills in total while the pills have the same reagent capacity. Unlike patches, they apply all their reagents at once after some time has passed depending on how much reagent there is. | ||
|- | |- | ||
|<center>'''Jugs & Buckets'''[[File:Jug.png| | |<center>'''Jugs & Buckets'''[[File:Jug.png|center|64x64px]][[File:Bucket.png|center|64x64px]] | ||
|During busy shifts, medbay will go through your supply very quickly. Larger and more readily available containers are Jugs. They hold 200 units and are a great storage for all your medicinal goodness. Buckets hold 250 units, not as readily available but great alternatives to jugs. | |During busy shifts, medbay will go through your supply very quickly. Larger and more readily available containers are Jugs. They hold 200 units and are a great storage for all your medicinal goodness. Buckets hold 250 units, not as readily available but great alternatives to jugs. | ||
|} | |} | ||
| Line 51: | Line 51: | ||
=== ChemMaster 4000 === | === ChemMaster 4000 === | ||
[[File:ChemMaster4000.png|left|128x128px]] | [[File:ChemMaster4000.png|left|128x128px]][[File:ChemMasterUI.png|604x604px]][[File:ChemMasterUIOutput.png]] | ||
[[File:ChemMasterUI.png]] | |||
Similarly to the Chem Dispenser, this will be your most used machine. It accepts beakers which will be shown in the upper portion of the UI, it will mix all the reagents which you can access in the buffer in the lower portion. It has an output, for which it accepts bottles, vials, patch boxes and pill containers. While you can make pills and patches even if you don't put their respective containers into the machine, it will create a mess by dropping all the pills/patches on the ground for you to pick up. | Similarly to the Chem Dispenser, this will be your most used machine. It accepts beakers which will be shown in the upper portion of the UI, it will mix all the reagents which you can access in the buffer in the lower portion. It has an output, for which it accepts bottles, vials, patch boxes and pill containers. While you can make pills and patches even if you don't put their respective containers into the machine, it will create a mess by dropping all the pills/patches on the ground for you to pick up. | ||
Labeling your pills, patches and all chems in general is a good way to tell your doctors all information they need to know, ranging from the name of the chem to it's effects, overdose thresholds and recommended injection amounts. | |||
Contrary to the Container element in the input, the Buffer will never mix any reagents and you are free to dump all excess for storage and later use. | |||
Revision as of 09:39, 14 November 2025
| Medical | |
|---|---|
| Chemist | |
 Chemist |
Roleplay Difficulty: low |
Chemistry can be one of the most important departments during busy and hectic shifts. While keeping medbay well stocked with anything they need can be daunting task, your role is one of the most appreciated.
Reagent Metabolization
Every reagent in game behaves in a similar matter. Any time you ingest a reagent, the amount remains in your bloodstream and will metabolize at varying rates. Every time it metabolizes, it's effects will take hold. For example, 5 units of Bruizine does not heal 45 blunt damage instantly. But rather, it heals 2.25 blunt per metabolized 0.25 units. However, if enough of the reagent is present to be considered an overdose, it's OD effect will be added to the metabolization, in this case, 1.5 poison damage.
Knowing the OD values is important especially if you want to create new mixes of medicines.
Reagent Ingestion
There are a number of ways a person can ingest reagents. Be it intentional, accidental or malicious intent, knowing these can be helpful for further optimizing or revolutionising the ways of medical treatment. Even though your job is mostly to create these chemicals, knowledge of ingestion can be used to fine tune your work.
The main methods you will be using are liquid chemicals, pills and patches. Medical Doctors can inject reagents into patients with syringes to instantly being the metabolization, or via pills which kick in after some time has passed. Patches work slightly differently, the mix of both worlds. They immediately being their metabolization but they inject their reagents over time, minimizing the threat of overdose.
More often than not, pills and patches are taken to-go to be used when needed.
Other ways include slipping and falling in a puddle, as well as reagent foams which can be synthesized or happen naturally during events. The latter can prove very deadly, as they apply their reagents in a rapid pace leading to easy overdoses.
Gears of the Trade
When it comes to toys to play with, you have a plethora. From basic necessities or optional upgrades to situational sidegrades.
Aside from the items and handheld gear you get, you get plenty of machinery to aid you in your cooking endeavours. Each of them has a unique use, while it can be slightly overwhelming at first, they are all easy to understand and get used to.
Most of them have their use grounded in reality and with some intuitive thinking, you can breeze through their uses.
Chemical dispenser

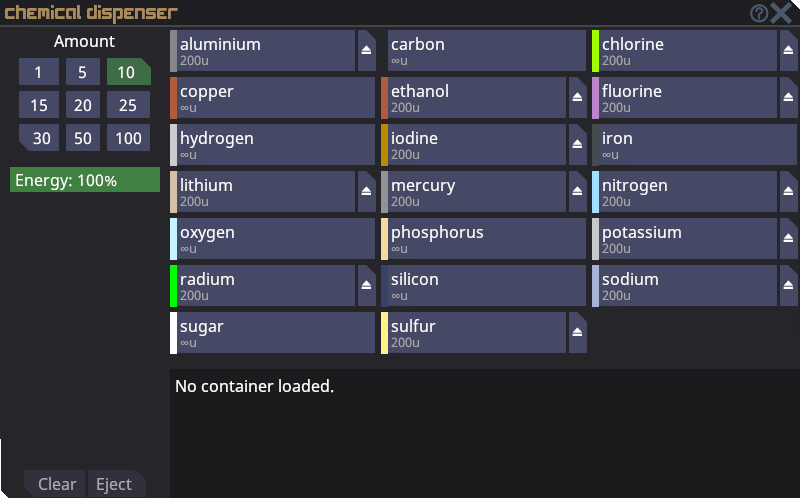
Your own holy grail. Comes preloaded with most of the elements you will use. It will only accept beakers into it's inventory and can be dispensed at varying amounts. Elements such as Aluminium, Chlorine, Ethanol, etc. can be dispensed until they run out. Alternatively, you can take the whole jug out and empty it into the ChemMaster 4000. Other elements such as Carbon, Copper, Silicon cannot be taken out and do not have a limit on how much you dispense. Each time you dispense one of the infinite elements, the internal cell will lose some of it's charge. The cell is interchangeable and chargeable but it also slowly recharges on it's own as long as the Chem Dispenser is in a powered room.
While it is possible to mix chemicals in the dispenser itself, it's easier and a much more controlled experience if it's done in a ChemMaster 4000.
ChemMaster 4000

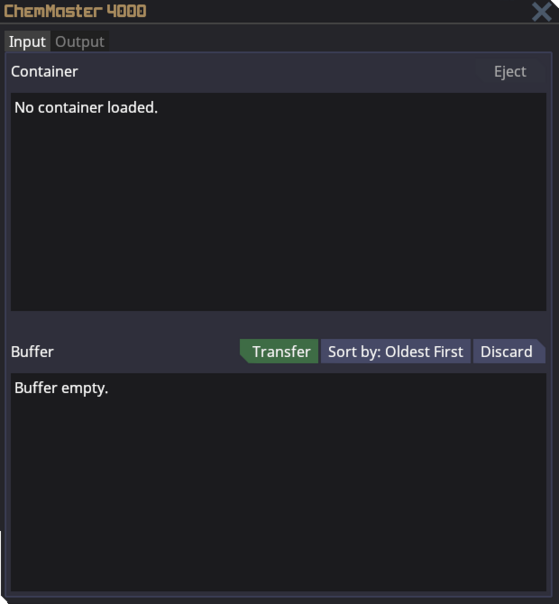
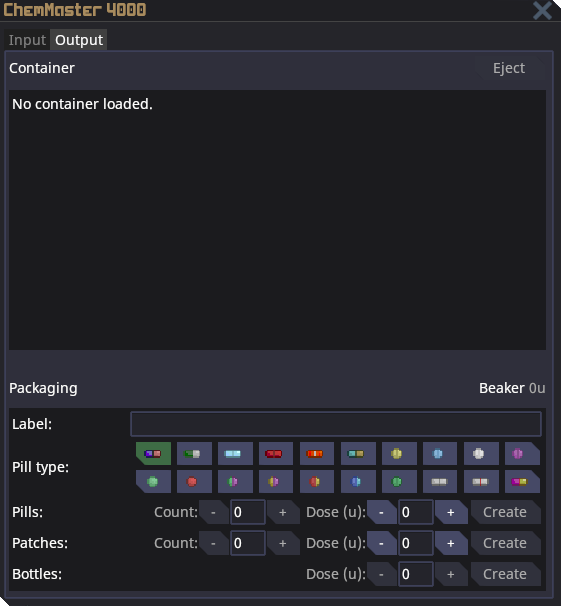
Similarly to the Chem Dispenser, this will be your most used machine. It accepts beakers which will be shown in the upper portion of the UI, it will mix all the reagents which you can access in the buffer in the lower portion. It has an output, for which it accepts bottles, vials, patch boxes and pill containers. While you can make pills and patches even if you don't put their respective containers into the machine, it will create a mess by dropping all the pills/patches on the ground for you to pick up.
Labeling your pills, patches and all chems in general is a good way to tell your doctors all information they need to know, ranging from the name of the chem to it's effects, overdose thresholds and recommended injection amounts.
Contrary to the Container element in the input, the Buffer will never mix any reagents and you are free to dump all excess for storage and later use.


