Roleplay Difficulty: Undefined Gameplay Difficulty: Average Playtime Requirements: Technical Assistant: 4h Access: Maintanence, Engineering Supervisors:Chief Engineer Subordinates: Technical Assistants Responsibilities: Station repairs, Power production management Guides:Guide to Construction, Guide to Power, Guide to Atmospherics, Tesla Generator
As a recently promoted Station Engineer, your duties and responsibilities will increase. By now you should have a basic grasp of how different power production engines work, how to deal with structural damages and which end of the screwdriver you should use. You will always begin your shift with a toolbelt filled with the basic necessities and plenty of spares scattered around your department. Additionally, carrying some basic materials to keep them on hand if need be might also be a good idea.
Power
In the beginning of each shift, the power production is going to be your main goal. Assist your fellow engineers and possibly show a Technical Assistant by setting up the AME, see about wiring up Solars and consult your Chief Engineer on what your primary engine will be for the shift.
AME
AME flatpack. These can be found on every station within the engineering department, there is always a dedicated room for this engine.
AME Fuel Jar. This is the fuel the engine will use to produce power.
AME Core. The Core will appear when AME flatpacks are arranged in a way where the core will be completely surrounded by AME shielding on all 8 sides.
AME Shielding.
AME Controller. The only pre-constructed component. It will be somewhere in the corner of the AME room. Simply wrench it in place where you want the AME to be built and ensure it's connected via HV wires.
To construct an AME engine, place the flatpacks on at least a 3x3 grid. Use a multitool on the flatpacks to unpack them and the [4] AME Shielding will appear. In a 3x3 grid, once unpacked the [3] AME Core will appear in the middle. Larger AME builds are possible including but not limited to: 4x3 grid with 2 cores, 5x3 grid with 3 cores, 4x4 grid with 4 cores. Take an inventory of available flatpacks to see which one you are able to construct.
Once constructed, insert the [2] AME fuel jar into the [5] AME Controller and interact with it.
The only important thing to note in this UI is that the Injection amount needs to always be twice the amount of core count for nominal power production. Once you've set it up, toggle the injection and you're done. One thing to note is that the AME will consume it's fuel at a very rapid rate, meaning that once it's active, setting up the main engine will be your primary goal. Upon completion, turning off the AME to preserve it's fuel in case of emergency. Running out of AME fuel before setting the engine up will make your job much harder since both the Tesla and Singularity require power to maintain the barrier. Absence of a barrier will cause the Tesla or Singularity to become loose, which will induce devastating structural damage and potentially irrecoverable deaths.
Wiring
What's the point of making all that power if you cannot distribute it across the station? As the station engineer, your duty will be ensuring the power runs smoothly to the entire station. But before we go fixing any issues, we first have to familiarize ourselves with the wiring, machinery and tools you will have at your disposal.
Power can be split up into four parts
Production: AME, Solars and the main engine.
Storage: SMES units.
Distribution: Substations
Consumption: APCs and the machinery they power.
Arguably, Substations and APCs can be counted as storage since they do preserve some charge although not as effectively as the SMES units do.
The SMES unit will be connected to a power source. It will charge up and act as a battery. SMES input and output are connected with orange High Voltage [HV] wires.
The Substation. They are present in maintenance tunnels of each department. They're connected to the main grid with the HV wire and will output power with yellow/orange Medium Voltage [MV] wires.
The APC. They hold a small amount of charge, if left unpowered they will shut down within seconds. They output power into the green low voltage [LV] wires which will power the actual equipment that occupy the rooms they're in.
5. Do note that both the HV and MV wires are directly connected to the SMES and Substations, but the LV wire, although not directly connected to the light tubes will still power them regardless. The LV wires have a small area of effect.
If you cannot see the wires, prying the floor tiles is not necessary as you can use your trusty t-ray scanner which will show all pipes and wires beneath the tiles.
Power production and load. Total generator output is the combined output produced by your engine, AME and solars. Total battery usage is the amount of power being used to fill up the internal batteries of your SMES units. Total network loads is the amount of power needed to sufficiently power the station.
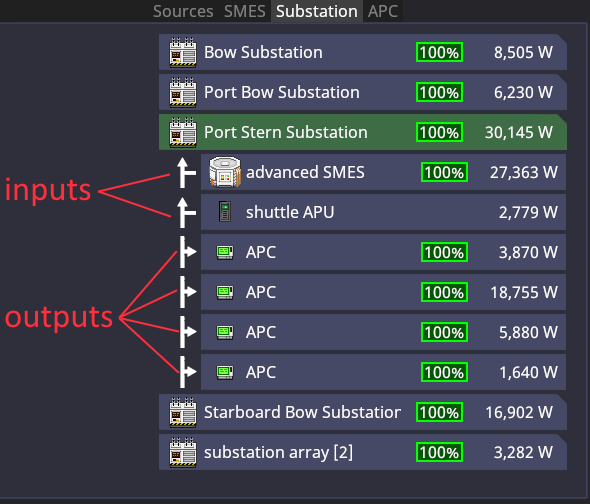
Power related Machinery. Clicking on any entry in the section will show you a detailed list of every connection they have, what they receive power from and what they distribute it to. In this case, the Port Stern Substation is being powered by the advanced SMES and itself, powers 4 APCs.
Toggle which wires you want to see on the screen. Note that both wires and walls shown in the main image are dynamic, meaning if there was an explosion that left a hole, that hole would be visible. Excellent way to check if the department reporting power issues is actually connected to the grid.